If you live in a house that has been remodeled by hippies and hillbillies over the last 80 years, you may live in a house like mine. Often I find myself covering doors with blankets in the winter; stuffing plastic grocery bags in cracks and crevices; placing rugs in doorways between rooms; in addition to covering my porch in plastic to make a greenhouse which also blocks the cold and wind on the South side which simultaneously traps sun rays/heat. I also use trash bags/sheets of plastic to cover the windows in the winter. I've seen people use bubble wrap for windows as well, which also creates an artsy appeal.
I realize this is probably the many ways poor people attempt to keep
their house warmer in the winter time. But every house has cracks and crevices that cold air and winds come through--especially around the doors and windows. But because I have holes and cracks in places of the floor in my house, I have to cover those particularly well to keep out the cold. Obviously I am not so poor I'm not using some kind of heating system. I am privileged enough to using gas heat via two wall units. And if it gets any colder, we use the portable heaters. I am disheartened by the many people that because of homelessness and forced out of society, that will either die or suffer the cold outdoors. I have slept outside when it was 50 degrees, and even 30 degrees and I complained; and I've slept outside when it was 9 degrees, but I had many blankets and another person to keep me "warm."
Something many people around my area use is a wood stove. My grandpa cuts dead trees to use to burn for his wood stove. It is hard to come across wood for free, but he gets some that are discarded at pallet/saw mills, wood on the side of the road, he drags wood from his woods, and I give him logs that I have dragged from my neck of the woods. My grandpa also grows trees around his
house to block cold winds in the winter, and shade the house to keep
cool in the summer.
I grow over 15 potted (tropical) plants in the house right now, so this is also adds to the humidity. It is a good idea to get a humidifier as well for those humidity-loving tropical plants, which will also add moisture and warmth when it often seems dry in the house in winter.
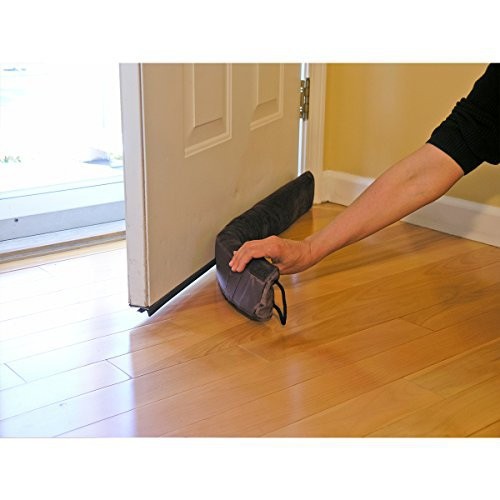
Recently I have been using weatherstripping that is adhesive-backed foam
you put around the the doorstop (seen in the picture.) I say I have
been using this weatherstripping because I have been reapplying it and
taking it off to put new stripping on since I have 5 cats outdoors that
tear it into pieces. They claw at the stripping and completely tear it
off, so I'm continually reapplying because I have the stripping outside
of the door. So as I was looking for new options to keep the cats from
doing this, I wanted to show you some of the ways I'm going to
weatherproof my home this winter.
Obviously, if you have a fireplace in your home, block the top of the chimney from the cold with plastic tarp and use rope to hold it in place. Cover the fireplace on the inside too. Double up on your drapes for the windows at night time. In the day, open the curtains/drapes to let sun in. A blog here will show you other ways to weatherproof your home and keep your house warm in the winter: 20 frugal ways to keep your house warm.
Also, you can do what I did with my porch and turn it into a "greenhouse" by covering it in plastic. In the pictures below is the hillbilly rigging style to turning the porch into a greenhouse. With the materials I had around my house, I screwed nail screws into scraps of wood that held the plastic in place to the roof and poles of the porch. I also laid down plastic on the floor boards to block additional cold air/winds. Additionally, I have the bottom ends of the plastic being held by bricks and cinder blocks. Like I said, I have five cats outdoors and also a dog, so this "greenhouse" was really a place for all the animals to stay warm in the winter. I assembled a tunnel system using shelves and things for the cats, and covering that with a blanket. Also laying blankets down for the dog to sleep on. These are some privileged cats and dog too because I put their blankets in the dryer to heat them. And then wrap the animals in blankets to stay warm throughout the night.
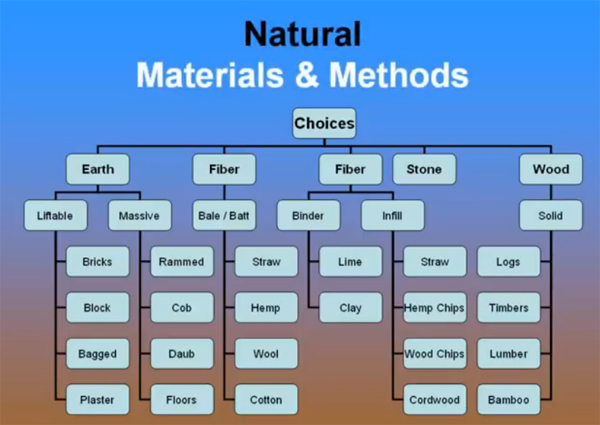
The one material I disagree with using is the Wool. The Wool industry is cruel, and instead I would use denim as insulation. Along with the denim, natural home builders use aluminum foil as a reflector for light to generate heat.
The lumber industry is another cruel industry that rapes forests, so I'm not comfortable with having someone kill a living tree for me. Instead I would build a small scale home that requires no logs. If wood is mandatory I will find dead and dried logs from the woods. Unlike trees, bamboo and hemp grow quickly to be utilized for mass production. Bamboo could be used for framing, doors, and flooring.
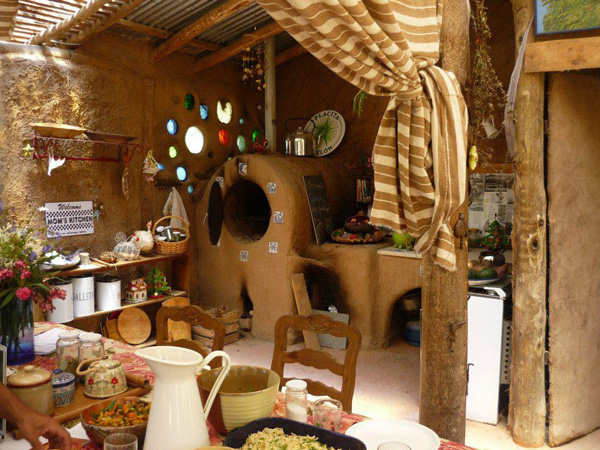
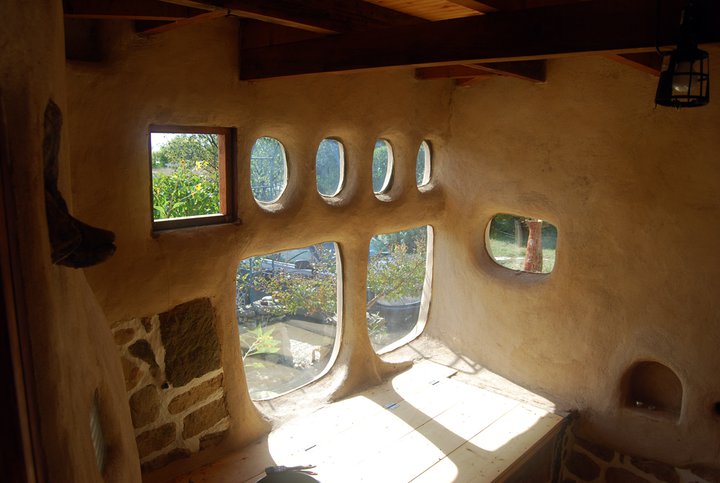
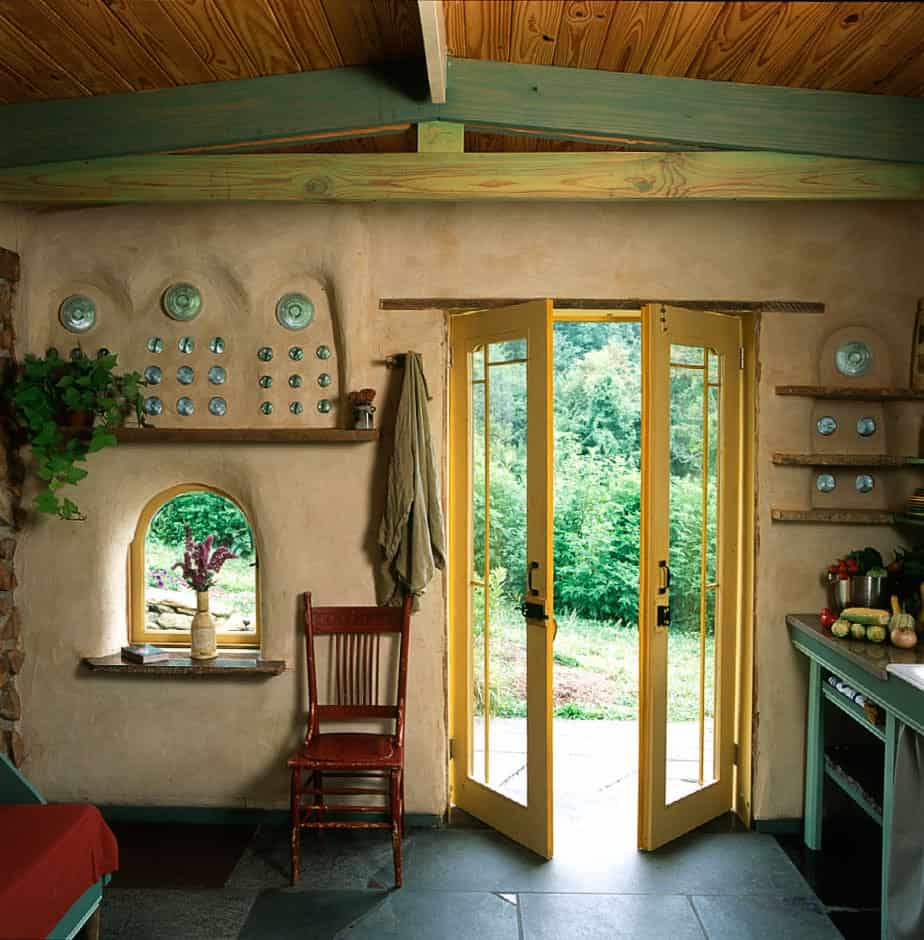
I highly recommend using all natural materials like mud, straw, and sand for the majority of your home (walls & flooring). When you're making your cob and stacking the cob to the walls, you want to save as much material as possible. Then using other materials like recycled glass bottles allows you to use less of your materials. Use recycled materials you have on hand such as glass bottles, tires, rebar, and more.
By reducing the amount of trash we produce, and reusing the trash that already exists will allow us to clean up our environment.
The first photo is a doodle we drew up. The cob home takes the shape of a spiral, similar to a sea shell or snail shell. I'm still unsure of the window facing North East. This is where the sun starts to rise, but I have heard from other cob builders that you'll lose heat having windows facing North East. I am definite on small windows in the South East and West, and a large window facing South.
As of now, the trench spans 26 foot wide and 26 foot in length. I'm not too certain it's that length and width because I was using my foot to estimate, since their around 10 inches. I'll get exact measurements later....
There will be 2 foot of cob walls on the outside. The entrance will be about three foot wide, depending on the door we find. The living space will be an open concept (with the kitchen counter, couch, and stove), spanning 8-10 feet in length and less than 22 feet wide. The bedroom will be surrounded by 2 foot wide cob wall spiraling inwards creating a nook. The length of the bedroom comes to 17 foot and the width of the bed about 8 foot. Most likely, the measurements are off, especially considering I was using my feet as measurement. Since writing this post, I have already dug the trench deeper, as well expanding the house another 4 feet.
On a piece of paper, you don't realize how small this house will be until you look at the photos I posted below. Already, we have dug out the trench, which we will be digging deeper about a foot or two. Really the trench I dug is a visual of the shape of the house.
I need to save up money for a small stove to heat the house, which will have a pipe going up the wall out of the roof. In the sketch below, I have the stove up against the wall facing the living space. The wall behind the stove will release heat in the night, making our bedroom warm and cozy.
In the following photos you'll notice a trench in the shape of a half circle. Also notice the four sticks marking the entrance of the house, and one of the sticks represents the wall extending in the house creating the wall for our bedroom.
The square sheet of plastic, you see in the photos, represent the living space where the couch and stove will be placed.
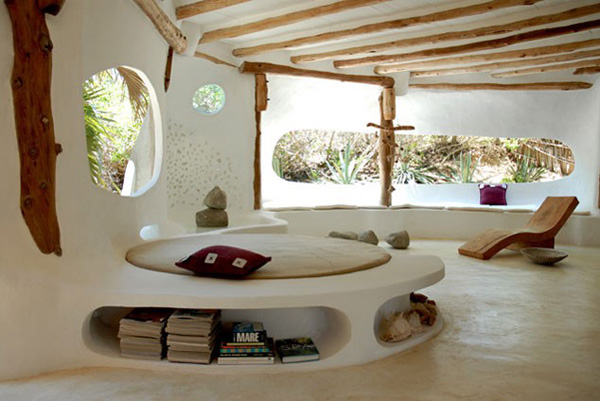
My vision for the home will look similar to Ziggy and April's creation, seen below. Their home was small but efficiently designed to save space. The picture here is the outside, and the second picture is a panoramic of the interior.
Again, I understand that this is an incredibly TINY
home to some people. I grew up in a trailer and a small house with five
other people. I usually shared beds and slept on floors. I am used to
living in a small conditions. I do not intend to have a shower or toilet
in the house either. My only intention with this home is to have
somewhere to sleep warmly at night and store food and books.
It's
actually liberating to live in a small home because you understand
what's most valuable in the home. Possessions are overrated and too many
possessions causes a feeling of "weighed" down or you feel like you
could never pack up and leave. You'll always worry if someone will rob
you of your stuff as well.
For over a month now I have collected logs, limbs, and leaves from the woods. I am slow to haul logs through the woods to my house because some weigh as much as 100 pounds. I usually roll the large pieces of log, and carry the logs that weigh less than 50 pounds. Some of the logs that weigh between 50-100 pounds are the ones I drag with a rope. Most of the wood and other tree matter is easy to collect because it's not far from my house, but that means carrying heavy logs for several hundred yards.
James has busted up some of the large pieces of tree. Larger pieces cover the bottom of the Hugelkultur mound, then limbs/branches/twigs are placed in the middle, then leaves are spread over top of the mound. The leaves will trap heat while the logs and sticks retain moisture. Over time the leaves decay over the rotting logs and become rich dirt like the ground floor of a forest. I find this method to be the most rewarding, beneficial, and efficient way to grow food.
Our experiment has been placing logs/leaves in the walkways of our Summer's Tomato garden. Considering we had 10 double rows of Tomatoes, we have made 12 Hugelkultur beds within our garden.
Attached to our Summer's Tomato garden was at least 5 rows of Pepper plants, which we have mulched with pine needles and leaves; but I doubt we turn this portion of the garden into a Hugel bed because it will be too close to the Cob home we're building within the Garden. I posted a video of the Hugelkultur mounds along with the Cob home trench in the video below. The video was from a couple of days ago when I had not added three additional rows of Logs, but you can see the photos afterwards of the progress so far. I will have an updated video soon so that you can get the "full experience" of the Hugel garden.
As mentioned, there are 10+ rows of logs and tree matter. In the photo below are the first Four rows which contain long thin logs.
The photo below shows you the following Four rows covered in leaves. These four rows are the Middle rows, which are nearly completed, while the other rows contain only large chunks of logs.
In the next two photo are three rows with large pieces of logs.
The photo below shows you the last couple of rows.
Yesterday I collected the three logs you see in the photo below. Essentially, I rolled each of them from the woods to my house. The biggest chunk was nearly 100 pounds and the other two were 60-70 pounds. James then busted the logs into smaller pieces, which will allow them to decompose much faster.
It's difficult to show you the entire garden in one frame, which is why I highly recommend watching my videos that I post on Youtube. The goal here is to transform the 13 rows into 13 Hugelkultur mounds. Once we limbs/branches/twigs/leaves over the logs, we will then add mulch/dirt/compost and other material which will help quickly break down tree matter into soil.
One other Hugel bed I am working on is seen in the next two pictures. The bed is approximately 3 ft wide, 3 ft tall, and 15 ft long. Weeks ago I began placing long, thin logs at the bottom of the bed, then sticks, twigs, then leaves. After several layers of leaves, I added Natural black mulch on top.