Showing posts with label avoid gardening mistakes. Show all posts

Sunday, January 24, 2021

January garden updates

January, 2021. I hope you are having a great new years so far. Make your new years resolutions! I have mine: save more money, eat the healthiest and most vibrant food.


Additionally, my resolutions are to continue growing my food forest making it bigger and better, and do good in my community. On Martin Luther King Jr Day, I volunteered some time at the food pantry where I live, and hopefully created a bridge with a community leader to do more good work this year and the future.


The Winter time is different for everyone. It's pleasant or miserable to some because it's cold, it's beautiful because of the snow or ugly because of the slush. To me, winter is a time that is neither pleasant nor miserable, beautiful nor ugly. It is a time when you get things in order. For me, I am getting things in order for my gardens in the upcoming months when the season turns to Spring. 

As you may know, I live in Zone 6, there's not much you can grow over winter here unless you take many precautions.

There are rows of kale, radish, broccoli, and cilantro still growing in my gardens which I have kept covered for protection. But, who knows if these veggies will survive with only cloth and plastic over them in the next months of Winter.


Most of my garden tasks for now consists of making compost and cleaning the outside gardens, and caring for my indoor tropical plants. This week I mended broken coffee mugs and planted in them. 


My indoor plants keep me motivated and inspired to continue growing throughout the cold, dreariness of the Winter months. They give me hope for life, sustainability, and happiness. I make sure to keep them warm, add soil, fertilize, clean them, pick off dead leaves, etc. 


I have 21 indoor plants. That is constantly changing too, because some die, some bear more "pups" and sometimes I buy plants, sometimes I'm gifted plants. There's always something to do with your indoor plants when you have many of them. 

It is almost towards February. There are plenty of things you can start growing indoors. I never have luck starting early! I suggest starting the last weeks of February in starting lettuces and brassicas, but I have more luck growing these directly from seed in the outdoor gardens. Radishes, cilantro, spinach, prefer cool weather, so you van directly sow them in Mid March. 

Stay warm, safe, cozy, and happy planting!

Monday, January 23, 2017

Gardening economics: The Top 3 Questions I get asked

Often when I exhibit my garden harvests, people immediately start asking me how much I spend each year on gardening supplies, how much food I produce, and how much land I'm working with. These questions will be answered here, and I hope this is useful to all those that are curious and want to work with their own slice of land to grow food where ever and when ever.

1. How much do you spend on your garden every year?

Typically every year in the Spring, I buy $20 of mulch which is a truck load, and I spread that on the garden to start transplanting seedlings. Sometimes I will end up buying another truckload up mulch at the beginning of Fall for the fruit trees, so that will come to $20-40 in mulch every year. Then of course because I plant a lot in containers, I usually end up buying $30 in garden soil or potting soil. As for seeds, I typically do not need to buy seeds because I have been saving seed from my own crops for years, and I hoard seeds for the following year, so I don't usually spend any more than $20 on seeds. Although for the first couple of years I was buying $50-60 worth of seed to start my Non-gmo organic seed collection. And I always buy some plants at the nursery to get started early such as brassicas, tomatoes, or peppers that often take a long time to grow for a regular gardener, so I will spend no more than $20 on a certain type of plant every year. With all that factored in, I will usually spend approximately $90-110 total every year.

2. How much food do you produce?

Actually this is very hard to calculate because the foods I harvested were organic, some wild edibles, and some foods that are very unique that they may be quite expensive. For example, the figs that I grow and harvest, I'm not sure what they would equate to be because I have never been to a grocery store that sold fresh figs like they do in California. To calculate how much food I produced last year, I skimmed some harvest photos, and I would estimate that I grew over $400 worth of food.

Actually, this is a low estimate because like I said, I grew lots of fruit that I have nothing to compare the price to, especially the wild mushrooms I picked. In fact, I grow unique fruits and vegetables that add value to the garden. To get an idea of a big harvest for me in the garden, below I have posted photos of my garden harvests for the last couple of years:

2013

minus the peaches! 2014

2014

2015

2015

2015

2015

2016
Because I'm calculating last year's garden harvest, I actually got back less because I didn't garden as much last summer as I have done previous years where I've had help. In previous years without growing and harvesting peaches and figs and wild mushrooms in the garden, I was growing $1000 every summer in squashes, greens, tomatoes, and peppers. 

3. How much land are you working with?

In previous years I have been permitted to use my grandparents' gardens that they grew on for decades, and now I have taken it over to use. I'm not quite sure what the footage of this garden is behind their house, but I will estimate that it's a 60-70 foot long garden and 15 foot in width. The garden in front of their house that I have been using is a little smaller, but still a lot larger than the garden at my house. This one is probably 50 feet in length, and the garden I work with at my house (on my mother's property) is perhaps a little more than 40 feet in length. On my mother's property (which is 0.6 acres), I grow fruit trees all over the garden and around the house. There is over 14 fruit trees on the property (cherry, plum, peach, nectarine, pear, figs), and over 20 fruiting bushes (blueberries, grapes, raspberries, aronia, blackberries, goji.)

Of course, not everyone has even the small amount of land I'm working with, so I want to mention that I have many posts on growing in containers indoors, and growing food as an apartment dweller, so I recommend reading those posts if you're an aspiring gardener that does not have their own land yet. Here are some suggested posts to visit for apartment dwellers:

Grow Veggies & Fruit trees in Containers (Limited Space & Urban gardening)

Recycled Bucket Gardening (container gardening for apartment dwellers)

1200 square foot apartment garden

Friday, January 20, 2017

Common Tomato Plant Ailments & Pests


Original post @ Organic Tomato Garden Tips to read full article, in addition to Using Hydrogen Peroxide with added information.

Early Blight

"Caused by a fungus Alternaria solani, early blight is also known as target spot or alternaria leaf spot. Signs of early blight are loss of leaves on the lower part of the plant and brown or black spots that are 1/4 to 1/2 inch in diameter that appear on lower leaves. Spots often merge and form odd-shaped blotches and may look like a target. Leaves will fade to yellow and dry up. Early blight often attacks the tomato as well, leaving large black concave areas on the tomatoes. Warm damp weather helps spread early blight. Fungicide is used to control early blight. Follow manufacturer’s instructions when using any fungicide on your plants.
Verticillium Wilt
"The fungi Venticillium albo-atrum and Verticillium dahlie are the cause of verticillium wilt. Small yellow patches appear on the lower leaves of the plant and, eventually, as the disease spreads upwards, leaves turn yellow, wither and drop. Verticillium wilt also causes the internal browning of the stem near the soil line. Infected plants can survive but their growth is often stunted and their crop yield is lower. Controlling verticillium wilt is difficult; no fungicidal treatment has been effective. The best way to prevent verticillium wilt is to choose tomato plants that are not susceptible to the disease. Look for tomato plants or seeds that are labeled “V” for verticillium-resistance. The Better Boy, Big Beef, Roma and Early Girl are a few varieties of tomato that resist verticillium wilt."

Bacterial Spot

"Bacterium Xanthomonas campestris pv. vesicatoria causes bacterial spot. This disease appears as brown spots on the leaves and stems of the tomato plant. The splotches are about 1/8 inch across and feel slightly slimy to the touch. As the spots begin to grow they often appear to be surrounded by a yellow halo. Once spots become abundant, they will grow together and cause the leaves to turn brown and wither. Bacterial spot can affect the fruit of the plant. Black dots will appear on the tomato and will enlarge to 1/4 to 1/2 inch in width and become sunken, gray and scab-like. Keep areas around tomato plants weed-free to help reduce the chance of bacteria growth. Fungicide is effective in controlling bacterial spot. Follow manufacturer’s instructions when using fungicides on your plants."

Bacterial Canker

"Plants infected with bacterial canker often appear to have the disease on only one side. Eventually the disease does spread to the entire plant. Caused by a bacterium Clavibacter michiganesis subsp. michiganesis, bacterial canker can cause extensive damage to your tomato crop. Young plants will suddenly wilt and older plants will experience browning along the edges of their leaves. In rare occasions, the stems of the plant will develop cavities or brown cankers. Raised white spots may occur on tomatoes, sometimes called birds-eye-lesions, and the white spots will turn brown as it ages. Control bacterial canker by planting disease-free plants and keep areas weed free to reduce chances of bacterial growth. Copper spays have little effect on the bacterial canker and, most likely, will not stop the spread of the disease".

Septoria Leaf Spot

"Septoria leaf spot is caused by Septoria lycopersici. The first symptoms are small, water-soaked spots. The spots grow to about 1/8 inch in diameter, then develop grayish-white centers. The edges then turn dark. The spores of this fungus are spread through rain and from watering from above. Eventually, the leaves turn yellow and fall off. While the infection can invade the plant at any time, it is most commonly seen after the plant sets fruit, according to the University of Iowa. Control septoria leaf spot by planting healthy plants with the proper amount of space between them, watering at the base of the plants, watering in the morning, removing dead and decaying branches, and keeping any fallen plant debris cleaned up"

Aphids

"One of the most common pests on tomatoes is the aphid. Aphids suck the sap of the plant causing misshapen foliage and fruit. Introducing beneficial insects into the garden can help this problem. The natural predators of aphids are laceywings and ladybugs.
Hornworms
"Hornworms are a green caterpillar with small black spots and two protruding antennae on their heads. They eat foliage and the tomatoes and can do a lot of damage before you find them. The best defense against hornworms is to go in your garden often and pick them off the plants... Another remedy is to sprinkle flour on the tomato plants."

Cutworms and whitefly

"Cutworms damage tomatoes by cutting the stems. If you see this damage on your plants use wood ashes on the ground around the stems. Another common pest is the whitefly, which makes the tomato leaves yellow and distorted. Laceywings and ladybugs are also effective for this insect, as well as spraying with garlic oil or using yellow sticky traps."

Blossom end rot 

"A water-soaked spot at the blossom end of tomato fruits is the classic symptom of blossom-end rot. This relatively common garden problem is not a disease, but rather a physiological disorder caused by a calcium imbalance within the plant." Some gardeners suggest using eggshells because it contains calcium, but other gardeners protest that using eggshells is not useful because the shells take time to break down. In turn, they suggest keeping consistent soil moisture around the plant. Frequency or amount of water is not key, just consistency. Additionally, "Excess ammonial types of nitrogen in the soil can reduce calcium uptake as can a depleted level of phosphorus" according to one user at a garden forum here. This user also suggested Tums tablets, which I would consider Calcium vitamins as a handy "supplement" to the plant/soil if you have nothing else on hand.

Companion planting

"Traditional gardening wisdom teaches that certain plants grown together create mutual strength and disease resistance. Companion planting is one way to create a disease-resistant tomato plant.  Tomatoes become more disease free and pest resistant when planted near onions, nasturtiums, marigolds, asparagus, carrots, parsley, and cucumber. Basil repels whiteflies. Dill and borage repel hornworms."

Organic Insect Spray

"Garlic and pepper is an all-purpose bug spray for common tomato plant problems such as aphids and hornworms. Its strong odor keeps many insects away. This spray also stops mildew.
Organic Fungicide
"Baking soda has been found to have fungicidal properties. Baking soda spray is effective for tomato blight, powdery mildew, and as a general fungicide. Use as a preventative or when blight problems have already developed. An effective mixture is baking soda, vegetable oil, and Castile soap. Another popular organic fungicide is an apple cider vinegar and water mixture."

*Peroxide is another useful ingredient in the garden regarding health and prevention. This is because peroxide "works by releasing oxygen. It acts as an oxygen supplement for plants. It seems to really support both good health and strong growth for plants.
Hydrogen peroxide can also help with soil fungus: it aerates the soil, and it is anti-fungal. (It is also anti-bacterial)" according to Using Hydrogen Peroxide. Additionally, peroxide works as a General fertilizer, either in plant water or sprayed on foliage. Secondly, peroxide helps sick plants, which can be applied by using a Spray bottle on the leaves and add to water. Mold or fungus on plants or in the soil can be controlled by using Hydrogen peroxide on plants or in the soil. If you’ve got mold on the plant, spraying the leaves is probably best. Third, Hydroponic gardeners often use peroxide to feed plants, by adding it to the watering system. Also, a Peroxide Spray on tree cuts, helps prevent infection. Peroxide as a spray in the greenhouse controls mold and mildew. Sprouting seeds before planting using water and peroxide that seeds soak in for seeds to sprout faster and grow stronger. Rooting cuttings appreciate the added peroxide in water, if you’ve put the cuttings directly into water before planting. Or, if you’ve put the cuttings into soil or medium, use peroxide in the water you’re using to water the cuttings with.

*Epsom salt as a fertilizer for tomatoes as well. A healthy plant that is more mature will be less susceptible to pests and/or pathogens. Overall, Pest control for tomatoes begins with creating nutrient-rich soil so plants are strong and resistant to disease. Add organic compost to soil before planting.

Compost Tea Spray

"Keep blight and other pathogens away from tomato plants with a compost tea mixture to spray on affected leaves. It is also used as a soak around the base of the plant. Compost is rich in microorganisms that have anti-viral and anti-fungal properties. Dilute the compost/water mixture and let it sit for 1 week before use to ensure that plants are not burned".

Beneficial Insects

"Ladybugs, praying mantis, and lacewings are known as “beneficials” and they are a very effective organic pest control for tomato problems. They eat the insects which chew and destroy tomato plants, such a flea beetles and aphids."

*You can attract beneficial insects through creating their ideal environment. Recently I posted examples of ways other gardener made "bug hotels" that attract these insects, here: Beneficial insect/bug hotel ideas

Saturday, October 31, 2015

Cold frames made out of recycled materials

Cold frames function like a mini greenhouse because they are small enclosures, usually low to the ground, and protects plants from the cold. Cold frames have a transparent (plastic or glass) top, allowing sunlight to enter and trap inside. This prevents heat from escaping, which creates a micro-climate providing "several degrees of air and soil temperature insulation, and shelter from wind. In cold-winter regions, these characteristics allow plants to be started earlier in the spring, and to survive longer into the fall and winter. They are most often used for growing seedlings that are later transplanted into open ground, and can also be a permanent home to cold-hardy vegetables grown for autumn and winter harvest" ("cold frame", wikipedia).

The best cold frames I have seen were made out of recycled materials, found around the yard/house or in the woods. And usually when making cold frames out of recycled materials, this requires minimal materials, less work, and usually no power tools.
Most often I see the top of the cold frame made out of recycled windows or doors. Actually I use recycled glass shelves from an old refrigerator to protect the greens growing in buckets (here). The frame can be made out of recycled pallets/pre-cut wood, sticks/branches/logs, bricks, stones, cinder blocks, straw bale, and much more.
Here I show you the cold frame ideas made out of recycled materials, or minimal materials.

pinterest
pinterest
pinterest


Landshare

High mowing seeds
SHTF prepper
photo source

Bepa's garden
Cold frames can be as rustic or professional as you can manage. The mindset is to make it happen, rather than set yourself up for limitations.

Spotts Garden Service
When starting a fall or winter garden, do not think so large scale, because you may not be able to cover and protect all your plants. Usually I grow a small patch of greens throughout the fall and winter, and that is just enough to for a salad everyday. This year I wasn't as successful because of other challenges (squirrels and other animals digging up my seeds and eating the plants). 

photo source
seasonal wisdom

photo source

Lastly, an important tip in making the cold frames: angle the cold frame so that it faces south, and the glass is 39 degrees from the back wall (which should be taller than than parallel wall.

Friday, September 26, 2014

Gardening Mistakes I made in 2014

This post is a follow up from my post  Comprehensive list of my Top 20 Gardening Tips. Every year I am much more satisfied with my garden production, and the Fall season is a time to reflect on how I can improve the next Gardening year.
Although I make less mistakes in my gardens as the years go by, I usually have different issues every year. You can read my first and second year's gardening mistakes at Gardening Mistakes 2013 and 4 mistakes as a First year gardener. 'Mistakes' isn't the right word for it-- really, it's laziness. To be fair, I get a bit lazy as the Summer progresses into hot weather. Not only that, but because I have gardens off the property which I reside, I manage those gardens much less. On the property which I reside, the gardens are managed much better. Of course I slack on the gardening tasks necessary to have an impressive garden.
Often my issue comes from avoiding making plans. I don't always envision what needs to be done in the garden to make it better, so the tasks simply do not get accomplished.

cardboard around Cucumbers to suppress weeds
1. For example, when I made wide walking paths between my rows of potatoes, I expected many weeds to grow on the walking paths. I assumed I would be walking along the rows which would smother out any tall, invasive weeds. Actually I never walked through these paths so the weeds got too tall to manage. It wasn't until we were harvesting potatoes that we had to chop them down.
However, I did lay out cardboard for the long row of Cucumbers. The weeds weren't too terrible around the Cucumbers, but eventually the weeds were unmanageable because they sneaked through the cracks of the cardboard.
Although it's too late to worry, I collected cardboard from around the house days ago to lay them on walking paths between the rows of Tomatoes. This is task was preparation for transforming my Tomato and Pepper garden into Hugelkultur beds.
In the future, I am laying out layers of cardboard in between every row of vegetable as soon as I establish the rows. I am not waiting until we have weeds in the rows-- as soon as I hoe up mounds for the lettuce, potatoes, cucumbers, tomatoes, or anything-- I am going to lay down cardboard!
Cardboard is an unlimited resource if I can go into town. Behind every store, they keep cardboard stacked high in the garbage bin.

Tomato plants tied at the middle resulted in falling down
 2. Another task I slacked on was staking every Tomato plant. Of course I did stake every Tomato plant, but I improperly did so, which resulted in the Tomato plants falling over. Trying to save time and use less tobacco sticks, I posted one stick to every two Tomato plants. This was not a good idea considering I wrapped a string around both plants, instead of tying the plants individually.
Altogether, it was sloppy work, so next year, I am staking one post to one individual Tomato plant so that the Tomato plant can cling to the post. The real issue had been the two Tomato plants on either side of the stick was too far away to remain up against the stick, so the base fell onto the ground because I could not tie the base of the plant to the post. I could only tie off the middle of the plant to the stick.
As for Tomato plants, I don't think it will be necessary to start any Tomato plants indoors or purchase any Starters because my Compost beds always produce Tomato sprouts (even all over the yard and in my windowsill Tomatoes sprout).
Squash Garden
3. I still struggle with the best way to grow Yellow Squash and Zucchini. No matter how I grow them, because they become large and fragile, they fall over exposing their root systems.  I have directly sown them in large mounds, started them indoors, and even grown them so that I could continue to add soil around them (as you can see in the photo to the right).
I haven't seen "better" ways to grow Squash besides Permaculture methods, meaning to grow Squash in compost on top (or within) straw bales. Growing Squash plants in straw bales will be an option for next year considering we are taking a whole new approach to gardening with less tilling and utilizing hugelkultur methods.

4. My only quarrel with my Melons was that I started them as early as I could, and still they grew slow and small. My Cantaloupe fruits grew to perfect size, but my Watermelons were small. Almost all of my Watermelon developed a rotten spot on their bottoms. I wondered if this had to do with too much rain, as some have told me they do not like to be over-watered. I was proud that I maintained persistence in watering my Melon gardens through the dry weeks. Then again, the rotten spot could have been due to laying on the ground. Next year my plans with the Melon garden include laying out cardboard in the walking paths; composting all Watermelon plants; and mulching so that they retain moisture. I may also create a Trellis specifically for growing Melons so they can vine up instead of crawling all over the walking paths. 
The only Cantaloupe plant that produced the most (and biggest) melons was the Volunteer Cantaloupe plant growing amongst my strawberries. Of course this bed is full of compost and by continually watering this bed, the Cantaloupes flourished. My other gardens of Watermelons and Cantaloupe were either too small to eat (non-mature so unripe to eat) and many of them became rotten. Some Watermelon fruits became ripe enough to eat, though.
Altogether, Melons require much more maintenance, nutrition, different soil ratios than other plants. For this reason, I will also add creek sand for better aeration. By implementing compost, mulch, and trellises into the Melon gardens, I will have a much better Melon harvest next year.

deformed Cucumbers
5. I am surprised that I harvested less Cucumbers this year than the last. I directly sowed over 400 Cucumber seeds into a long row. Half of the row gets partial sun while the other half gets less sun than that. Obviously I was not surprised that the other half would not produce, but Cucumbers do well in partial sun (as noticed in the last three years of growing them).
Of course almost all of my Cucumbers plants sprouted but the other half which received no sun never made it to flowering.
I may have Cucumbers growing as we speak, but as far as I know, I harvested only two bags of Cucumbers. They were smaller than last years too, and somewhat deformed (see in photo above.) These Cucumber seeds came from last years harvest, so I am incredibly confused by the turn out.
Not only that, but I smothered most of the weeds around the Cucumber plants with cardboard, which still did not help their production. They also retained plenty of moisture and nutrition because the soil was in excellent condition.
Because Cucumbers are vining plants, my goal for them as well as the Melons are to create a Trellis so that they can crawl up and away from the ground/weeds. 

Corn growing close together
6.  The Corn rows were spaced too close together. The only reason I grew Corn was because it was on my Grandparents' property, and they wanted some from our Garden. Of course when we directly sowed the Corn, we did not imagine walking through narrow rows of prickly, fuzzy plants to harvest the Fruits. You can hardly walk through the path between rows to harvest. Considering the Corn was small anyway, we harvested some on the outside rows but we are leaving the rest to animals. Once the stalks die, we will use them as mulch or in our hugelkultur beds. Next year, I am not growing Corn unless if it is in small quantity, perhaps a couple of plants, rather than the 9 rows of Corn we planted this year. Corn is indigestible and a waste of my time. 

rows of small & large Pepper plants
I'm not being totally hard on myself, I made great alterations and improvements within the garden. For example, when my Strawberries were being eaten by birds, I placed figurines beside the fruiting plants which immediately kept the birds away. Also, my Lettuce garden this year flourished, along with the Kale. My Pepper plants did a great job because I was diligent in watering them and putting compost around the biggest plants (I even diluted my urine as a fertilizer for the Melons and Pepper plants). Because I predicted the Pepper plants I grew from seed were not growing as they should, I purchased several Pepper starters from Lowes --just to be safe. It turned out, all of the Pepper plants I had started--even the smallest Pepper plant--produced Peppers.

As mentioned, I'm taking a different route to gardening. Instead of exclusively Tilling the garden and having structured rows of Vegetables-- I am focusing on Permaculture methods, utilizing Hugelkultur beds, Straw bales, and Companion planting. I will also be growing Flowers within the garden. I will discuss all of this in more detail in a later post. 

I am already writing up information about Vegan Permaculture methods, and future gardening plans, so be on the look out for that post in the next couple of days. Also look through my most previous posts how other gardeners are recreating their own backyard into a Food Forest, Permaculture Trio and Val and Eli's Permaculture Paradise.
 

Thursday, September 11, 2014

How to Garden for free & Comprehensive list of my top 20 gardening tips

1. Hoe soil into short, wide rows for root vegetables and greens. The wide rows appeals to crowding greens and root veggies and allow for wide walking paths (like I have done in the picture below). The "crowding" method seems to prohibit weeds from growing. Also Short rows have also been effective for preventing pests because too much of the same kind of plant in a grouping attracts bugs.


2.  Create trenches in between sets of plants. When planting Peppers or tomato plants, or any plant-- hoe wide rows so that two plants grow side by side. The trench in between the plants will collect water like a chamber. This will allow the tips of roots to stay moist even if the sun has dried out the top of the dirt mound. For example, in the picture above, I have grown my lettuce in large wide mounds with wide walking paths (where water collects after heavy rainfall). 

3. Root vegetables, peas, and greens can be crowded. Despite what the instructions say on the back of seed packets, many plants do not need much spacing. Greens benefit from crowding because it  prevents weeds from sprouting in between. If I had a small amount of radish, turnip, peas, etc, I will squeeze all of these into one row rather than spreading the seeds for apart into different rows. The idea is that, you want to allow space for growing more variety of vegetables. See tip #4.
Side note: Root vegetables, peas, and greens (even cucumbers) can be grown in shadier locations of your garden during the Summer. Tomatoes, corn, peppers, and melons must get direct sunlight.

Crowding method with lettuce

4. Vegetables do not need much spacing. Aside from tomatoes and corn, most vegetables and fruits can be crowded. Here is a good rule: when sewing with seed directly in the garden, do not try spacing any more than 2-3 inches apart; however for Fruits and vegetables you are Transplanting, space these plants no more than 10 inches apart. Considering beans, cucumbers, melons and vining plants can be grown on a trellis, there is hardly any need to space these plants far apart.

Remember to continue to hoe (or add) extra soil/mulch around plants to allow roots to spread.

5. Root vegetables, beans, peas, greens, zucchini, squash, and cucumbers should not be started indoors. These fast growing vegetables can be directly sewn into the ground. Peas, root vegetables and greens can be planted in March through April, depending on your zone. Zucchini, squash, cucumbers, and beans can be directly sewn after the last threat of frost, usually first week of May. 

6. Tomatoes, peppers, and melons should be started indoors because of their long growing season. Allow tomato plants to grow 1 to 2 feet tall before transplanting to garden, then bury nearly the whole stalk (leaving top branches above ground). Use method #7 for proper tomato, pepper and melon growing.

7. Plant tomatoes 12 inches apart from each plant, be sure to tie your plants to post once they reach 2 feet in height. Continue to tie the main stem as the plant increases in height. In the following pictures I have demonstrated a technique that grows large tomatoes: first, plant two rows of plants close together for support, while leaving 2 foot wide walking paths in between. This technique prohibits weeds and bugs, allows drainage when dealing with floods, and creates an overall professional appearance. The wide paths in between the sets of rows allows for easier picking, hoeing, and tilling. By continuing to hoe dirt up around the tomato plants will promote larger and healthier stalks.

Paths for walking

8. Make your own soil (compost) with food scraps. Compost is the most nutrient rich soil, and will boost your plants like fertilize. For more compost ideas and information go to two of my posts here, "Compost your food scraps..and get food back for free" and "What you need to know about compost". Compost is a versatile and can be used for starter plants, growing in buckets or pots; and use compost to fill a raised bed (go here for raised bed and container garden construction).

Particularly compost that is not completely decomposed, Tomato plants, peppers, and squash will always sprout and flourish in my raised beds I have full of compost. Actually, I wish I had about twenty raised beds full of food scraps because I would not need to sew seeds, I could just hope for the volunteer Tomatoes, peppers, and squash to sprout. Last year in one of my Strawberry beds, I had one volunteer Butternut Squash plant that exploded with 20 Butternut Squash fruits! I truly believe the location and compost within the strawberry bed made the Butternut Squash flourish. This year in a different Strawberry bed full of compost, one volunteer Cantaloupe plant produced 10 Cantaloupe fruits! I never have that much yield in a typical garden. From now on, I want to experiment by making additional raised beds, filling them with food scraps, and enjoying the ease and simplicity without tilling and hoeing, while enjoying the high yields of the food that Compost produces.

Along with creating your own soil, dry out grass to make your own Straw/mulch. Simply Mow your lawn, let the chopped grass dry out for a couple of days in the Sun, and collect the grass once it turns into straw. Collect leaves as well to use for mulching.

Picture of my compost two years ago. I finally used it for my
strawberry bed.
9. Transplant your fruits, vegetables, or bushes/trees in the evening. Sowing seeds during the Sunniest/hottest part of the day isn't harmful to the seeds, but transplanting your starters in the middle of the day in the Summer will scorch your plants and possibly kill them.

10. Watering plants during the evening. Following up on Tip #7, the most optimal time to water plants is during the evening, after 5pm because the water will not evaporate and instead the moisture will be retained during the Night. And considering plants do most of their growing during the night, it is optimal to water right before dark. Remember to water plants every other day until hot Summer temperatures--then I would suggest watering everyday, maybe even twice a day depending on your climate. Go to tip #18.

Bean crawling up posts
11. Trellis Vining plants, such as Melons, cucumber and Beans. Allowing the Melons, cucumbers, Peas and Beans to crawl up tall Poles or trellises. Trellises will enable you to see & pick the Vegetables much faster, and you don't hurt your back bending over.

12. To Prevent pests, avoid growing Plants that attract the most bugs. Every time I plant cabbage, broccoli, collards, and kale, the bugs eat the entire plant. I had success with Kale this year, no bugs have demolished them, however I grew up to 200+ Broccoli plants in the garden, and something (bug or animal) ate the tops off every single one. Altogether, I avoid growing these vegetables, but my collard greens have been doing fine thus far.
Another method to avoid pests, by planting onions, basil, other herbs, and hot peppers around most vulnerable plants. As mentioned in Tip #1, too much of the same kind of plant in a grouping attracts bugs unlike a variety of plants in one grouping.
I had a small problem with Squash bugs eating my Zucchini plants, so every day I sprayed Vegan dish soap diluted with water, onto each plant for a week. This kept the bugs from eating the plants, and once the plants grew large enough, the bugs subsided.
This Summer I needed to prevent birds from eating my Strawberries, so I placed a Turtle and Snail figurine beside the Strawberries. This method absolutely has kept away the birds for weeks, and I have finally been able to harvest many more.

13. Tomato, Corn, and Beans do not require Fertile, rich soil. These three foods are the garden's staple-- at least in my home state of Kentucky. Tomato, corn, and beans will perform much better with nutrient rich soil, however they produce well growing in clay soil with no compost, mulch or or any nutrient supplement. Fortunately, these three foods are also the easiest to grow because they require little maintenance.

14. Tomato, Corn and Beans are the easiest to grow. Tomatoes will grow out of anything, anywhere, and at any time; and almost always produces higher yields than any other plant. I have had Tomatoes sprouting out of my windows!! If you are a first year gardener, tomatoes are the number one vegetable for a beginner...Tomatoes do not require much maintenance, as well as Corn and beans. No need to compost, mulch, or add any nutrients, as mentioned above. Some hoeing around Tomatoes will be beneficial but hardly necessary for corn and beans.

15. Peppers and Melons require Nitrogen rich soil. Not only do these plants and many others need nutrient rich soil, they require much more watering than tomatoes, corn and beans. Plants that need particularly more fertilizer are peppers, cantaloupe, watermelon, eggplant,and fruit trees. Fertilize once every two weeks until plant begins to harvest. Refer to Tip # 19 on making your own fertilize.

16. The best conditions for your starter plants. Begin by filling compost into starter trays, such as the 100ct or individual containers, or Styrofoam cups. Compost usually contains more nutrients than commercial soils, so this will give your seeds a much needed jump start. Making your own compost with food scraps will become your own free resource. 
While germinating the seeds, keep the soil moist by watering every other day (or more). Before the plants sprout, keep a lid on top of the plants to retain heat and moisture. Seeds/plants respond well to warm damp environments. My grandmother also tells me to keep the containers of seeds in a dark location or keep a dark lid over top of them during germination. Germination will last until the seedlings pop up, usually with 1-2 weeks.
After seedlings have popped up, take the lid off and keep in a sunny location. Seedlings will require at least 6 hours of indirect sun. When starting seeds indoors during Winter and Spring, use lamp lights or other artificial lighting if necessary, that may aid in the plant growth.
After several weeks to a month, transplant seedlings into the garden or a wider container. I ended up transplanting my Melons into three different containers until I finally transplanted them in the garden, but that is unnecessary if you start off by sewing seeds in a large container.
Unlike greens, squash, peas, beans, and corn that can be directly sown-- the plants that prefer to be started in a container to be transplanted are Tomatoes, peppers, and melons, eggplant.


raised bed made of logs and bricks
17. You do not need to till, hoe, or shovel to have a garden. In fact, I would suggest gardening in contained areas with plenty of rich compost and mulching will be easier on your budget, physical strength, and potentially will grow better quality of food. Also tilling breaks up the intricate microbes of the soil. It's easy to destroy homes of frogs, spiders and other things when you're disturbing the soil. There are plenty of techniques to avoiding tilling, shoveling and hoeing. 
Using straw bale with compost, or containing compost within a rectangular raised bed will allow you to grow food without tilling. You can also use buckets and pots to contain soil. Almost all vegetables and some fruit plants will produce/grow in pots/buckets. For more information about no-till methods, go to my post here: How to build a raised bed for gardening (No-Till methods)

18. Water garden everyday. When planting greens, root vegetables and herbs during the Spring, generally you're not going to need to water your plants because there is usually heavy rainfall during this time. However during the hottest part of Summer, you will want to water the plants every day. I would resort to watering two times a day (during the early morning and late evening). I will do this for plants that I recently Transplanted because they are more susceptible to Sun damage. Of course, it's not necessary to water Tomatoes, corn, potatoes, and beans with much frequency. However melons, greens, and peppers benefit from heavy rain. Cucumbers and squash also prefer constant watering.

rain barrels
The frequency with which you water plants will depend on your climate, the time of year, etc. The main point I wanted to make was, most people in the world are not allotted with enough water for growing plants. By implementing rain barrels against your house, you will be able to collect enough water to cover large gardens. Water can go along way, so even sitting out bowls, jars, cups, and any plastic container, buckets etc, you will be able to collect water for all your gardening needs. For more info on saving water, go to my posts:  How to save water 1 and How to save water 2. Tap water simply keeps the plants alive, but rain water makes plants thrive.

19. Make your own fertilizer with your body. Human urine is rich in nitrogen, potassium, and phosphate, which are all essential for healthy plants. Compost soil acts as a fertilizer because of the nutrient density and it's always best to use compost for starting plants indoors and also spreading compost around plants in the garden. Although I used compost on many of the plants in my garden, I wasn't able to spread all the compost onto every plant. In this case, I began urinating on plants that needed fertilized, like weak Pepper plants or weak Tomato plants. Remember to dilute your urine because it may be too high in nitrogen and salts. Even my watermelon mounds received some urine fertilize throughout the growing period. I haven't experimented with my own feces, but I will bring this up in a future post about composting toilets.
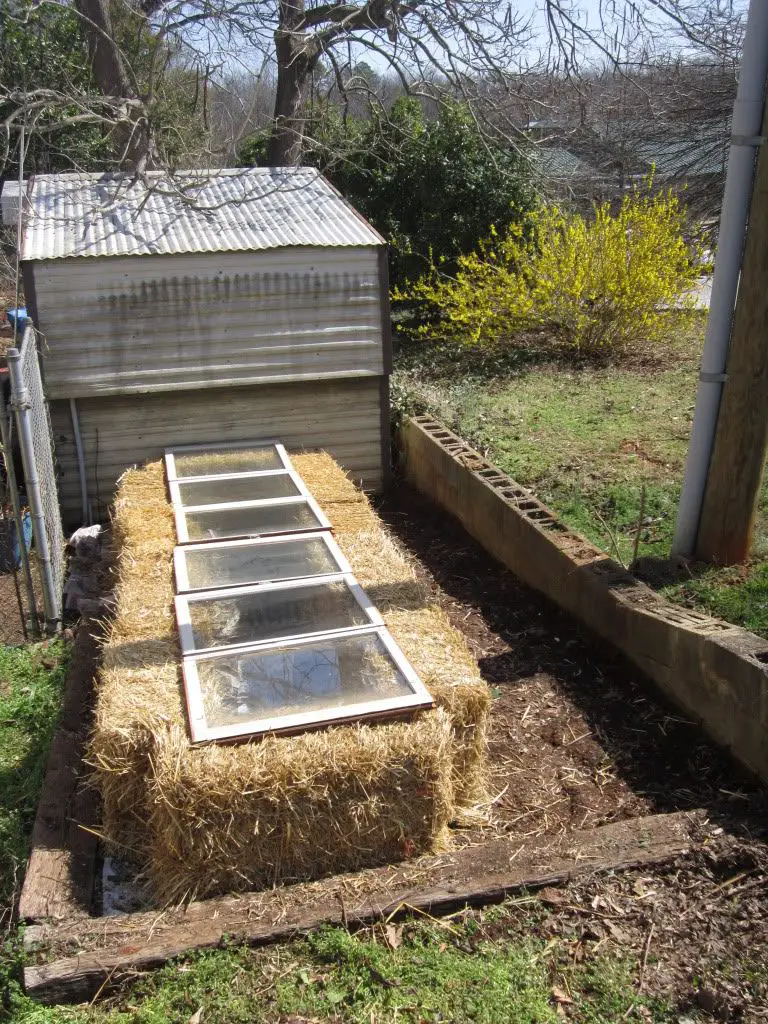
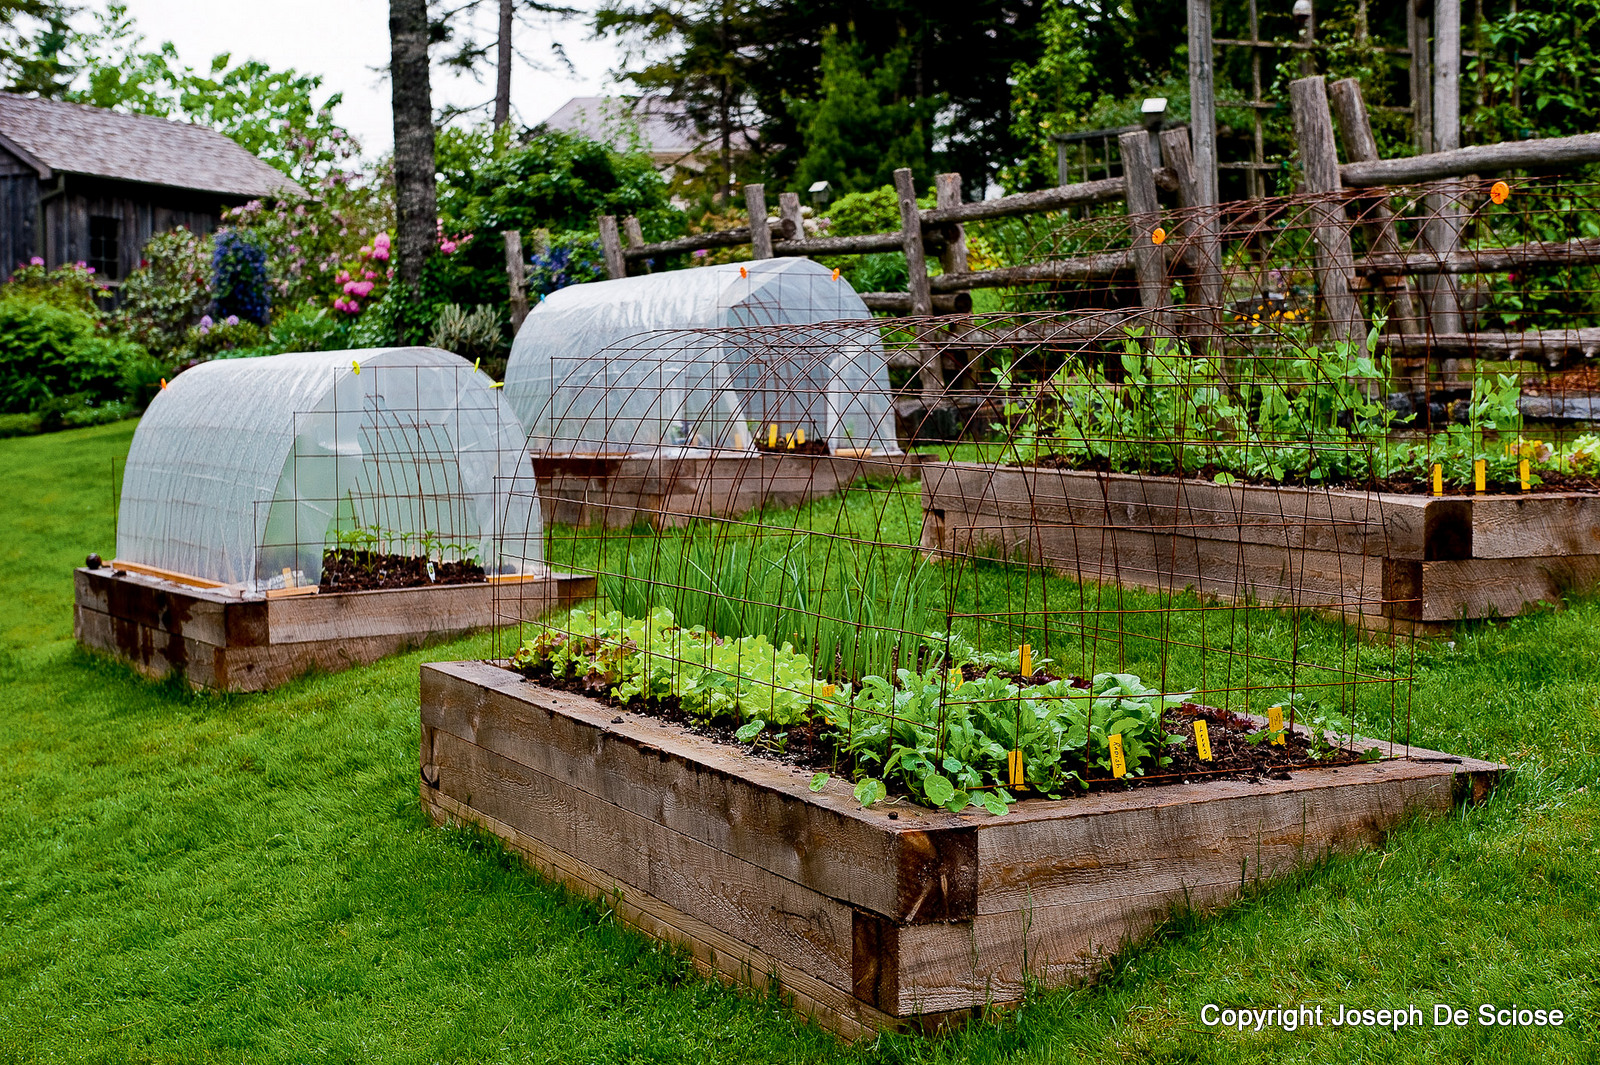
20. Cover plants with cloches in threat of overnight Frosts. Cloches are row covers or something that protects plants from cold temperatures. It's not unusual to start vegetables outdoors early in the season if you want to give your plants a head start. I usually grow greens, peas, and potatoes at the end of March and beginning of April, but these vegetables do not require covering unless if you're starting them at the end of February and beginning of March.
It may be perfectly warm and sunny during February's days, but most likely freezing at night. You can use recycled plastic containers of all kinds to cover individual plants overnight. You can also use plastic sheeting to create long row covers. In the morning, uncover the plastic container or sheeting to allow plants to breath (do this until no threats of Frost).
Many plants benefit from growing during the cool Spring weather, like Spinach, cabbage, Brussels, Swiss Chard, Kale, Collards. 
The earlier you plant seeds indoors or transplant outdoors, the earlier you will harvest food.


I skimmed other gardening websites for their Top Tips, and I found that they were the least helpful. Most of the tips I found were vague suggestions, and spoke too much about gardening tools. I wanted to provide specific suggestions that will answer all of the questions of a beginner. Also my intention was to provide options for people that have little to no money, for example: collect rain water, make soil with food scraps, and implement no-till methods. One last tip I suggest trying (another free way to grow food), is to sew seeds from fruits you bought from the grocery store or farmer's market.
For instance, if you purchased cucumbers, squash, melons and tomatoes to eat, eat the food and save the seeds from these fruits. Dry out the seeds, store in paper envelope in a cool and dry location of your home, then use them when you're ready to plant.

This extensive list of my Top 20 Gardening tips will continue to grow throughout the years. Maybe if I took another couple of days to write, I could have come up with 50 Gardening tips. My main message is to think of plants like ourselves, Focus on the basic needs of plants: food, water, sun (heat & light), oxygen, and sleep.

Practicing Permaculture methods will allow you utilize your creativity in growing food with little effort and no money.
For the last three years of growing food, I have made lists of my mistakes, which you can find here Gardening Mistakes 2013 and Gardening Mistakes 2012.

If you're an experienced gardener that would like to make corrections to this list or add suggestions, please leave a comment below.