Thursday, October 9, 2014

No money, work, or tilling involved: Permaculture

Permaculture, also known as "Permanent Agriculture" or "Permanent Culture" encompasses Seven functional components that act like a Forest: 1. The canopy (i.e. tall trees); 2. Understory layer (i.e. trees that revel in the dappled light under the canopy); 3. Shrubs (i.e. berry bushes); 4. Herbaceous Plants (i.e. annuals, biennials or perennial culinary and medicinal herbs); 5. Ground cover (i.e. Cover crops such as clover or any Plants that grow dense and closer to the ground); 6. Rhizosphere (i.e. Root layers within the soil like fungi); 7. Vertical layer (i.e. "runners" and Vining plants like beans).
PermaGarden

 
According to Holmgren, the Twelve Permaculture design principles include:


  1. Observe and interact: By taking time to engage with nature we can design solutions that suit our particular situation.
  2. Catch and store energy: By developing systems that collect resources at peak abundance, we can use them in times of need.
  3. Obtain a yield: Ensure that you are getting truly useful rewards as part of the work that you are doing.
  4. Apply self-regulation and accept feedback: We need to discourage inappropriate activity to ensure that systems can continue to function well.
  5. Use and value renewable resources and services: Make the best use of nature's abundance to reduce our consumptive behavior and dependence on non-renewable resources.
  6. Produce no waste: By valuing and making use of all the resources that are available to us, nothing goes to waste.
  7. Design from patterns to details: By stepping back, we can observe patterns in nature and society. These can form the backbone of our designs, with the details filled in as we go.
  8. Integrate rather than segregate: By putting the right things in the right place, relationships develop between those things and they work together to support each other.
  9. Use small and slow solutions: Small and slow systems are easier to maintain than big ones, making better use of local resources and producing more sustainable outcomes.
  10. Use and value diversity: Diversity reduces vulnerability to a variety of threats and takes advantage of the unique nature of the environment in which it resides.
  11. Use edges and value the marginal: The interface between things is where the most interesting events take place. These are often the most valuable, diverse and productive elements in the system.
  12. Creatively use and respond to change: We can have a positive impact on inevitable change by carefully observing, and then intervening at the right time.

Some Permaculture practices use animals like chickens or ducks to eat pests while fertilizing the garden with their scat. Also some people that practice permaculture will have chickens to eat their eggs or to eat the chicken. Obviously I am not promoting this type of Permaculture practice. I am specifically speaking for Vegan Permaculture practices where no animals are involved in the process. The use of animals may be "natural" to some, but I see nothing natural about domesticating an animal. Perhaps going into the woods and reclaiming deer scat isn't unethical and maybe this is a "Vegan" way to utilize manure. But again, we can use our own human waste for compost/nitrogen.

Overall, Permaculture is an ethical, ecological, and science based gardening design that practices sustainability, avoids chemicals, and machinery (that runs on petroleum oil). This philosophy extends to avoiding the exploitation of land and animals. The idea is to recreate the aspects of a self-healing, self-working food forest. Fruit and nut trees and fruit bushes maintain themselves. In fact they continually add loads of seeds to the ground every year, creating more fruit and nut trees. Fruit and nut trees provide pounds of food for years and even decades. Perennial flowers and herbs also grow year after years providing and aesthetically pleasing garden/yard. As many Perennial flowers you can add to your garden the better. As long as you can keep many bees around, you will be able to pollinate your fruits and vegetables. 

In Permaculture design, tillers and other machinery are not used because they are absolutely not necessary and they do more harm than good. In fact, No-till gardening allows for natural aeration of the soil, promotes natural drainage, saves water, reduces the need to weed, reduces soil erosion, saves time and physical exertion, retains life, and eliminates the use of petroleum oil.
The beauty of this philosophy is that there is hardly any money or work involved, especially if you're using materials on your land to create a food forest.

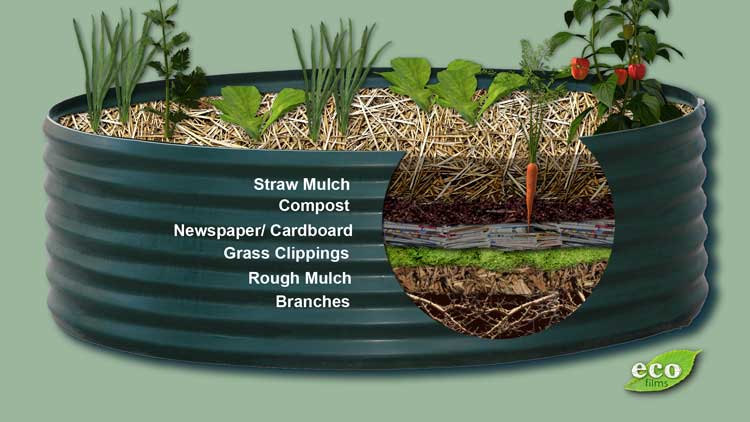
 No-till gardening allows us to build up an existing ecosystem by layering  the soil with carbon ingredients (i.e. cardboard, leaves, pine needles, straw, newspaper), and nitrogen ingredients (i.e. compost, weeds, urine, humanure). Instead of tilling (which damages ecosystems and does not build up soil), layering of "ingredients" perfects the nutrition, aeration, drainage all while retaining enough moisture to save water.

picture from Eco Films

Also, cutting your grass with a lawn mower is unnecessary if you're utilizing every space of your property (or yard). Mowing a lawn does not create a beneficial habitat for insects and animals. Not only that, but there is a reason a Forest is dense and the ground is shaded. A shaded ground will compost material faster, holding nutrients in, while a shaved lawn will expose the ground to the Sun taking away nutrients from the soil. However with a Knife or clippers, pruning dead or over-grown weeds can be used as mulch.

Going back to the Forest, you notice there is hardly any grass growing, perhaps in patches. But a Forest floor has been taken over with abundance of Trees, shrubs, leaves, Flowers, rocks, moss, Fungi. All of these aspects create a self-healing (self-working) mechanism which you can benefit from. It only takes you to mimic the rules of the Forest, and plant these things.

There is no such thing as a Pest in Permaculture. All insects and animals have their place, and it is up to us to know the beneficial insects. For example, Praying mantis, Wasps, Granddaddy long-legs, lady bugs eat harmful bugs. Instead of spraying Brassicas with repellants, add sawdust (which slugs and caterpillars hate) around susceptible plants like Cabbage. Any Cabbage loopers or worms can be relocated onto their own Cabbage plant (separated from the garden).
Permaculturists have noticed that young or weak plants are more susceptible to insects eating an entire plant; it seems that the nutrition from the soil which produces large and healthy plants,  will not be susceptible to insects.
Sometimes it's a matter of adding a native plant for the insects to eat. Many insects will avoid eating your food if you provide them with an alternative like a native plants (ild Mustard and Plantain weed). Marigolds are also beneficial in the garden. Growing Peppers, onions, garlic, and herbs around susceptible plants will also ward off harmful bugs. 

The intention in choosing natives, medicinal herbs, and other plants is to grow those that serve many purposes. Many Permaculture gardens contain Moringa Oleifera-- known as the most nutrient rich plant in the world. The Moringa can be made into a compost tea to feed plants,  or the cuttings can be used to mulch the garden which will still add nutrients. You can even make a tea out of the leaves for yourself. Fruit trees or usually serve many purposes, not to mention producing pounds of food, but provides shade for  plants growing below.
Beans also serve many purposes, adding nitrogen into the soil for surrounding plants. For example in the Three Sisters method, growing Corn, Beans, and Squash in close proximity. The beans will act as Fertilize to the Corn while the Squash will smother out other intruding plants. The Corn acts as a pole for the Beans to crawl up as well.
Choosing plants that serve many purposes is similar to Companion planting. For instance, Carrots love Tomatoes, Roses love Garlic.

Picture from Two Little Men and a Farm


I have recently posted videos of other gardeners who transformed their backyard into a Food Forest, which you can see here: Val and Eli and Permaculture Trio. I highly recommend watching those videos because they will allow you to visualize some of the details I have outlined so far.
Another  video I recommend (see below) discusses types/aspects of Permaculture, for example, Hugelkultur, Straw bale, Sheet Mulching, soil/compost bombing, Ruth Stout Method/Composting in Place, and living mulch systems:


As mentioned, recreating a layering system like a Forest provides much more benefits. For example smothering/preventing undesirable weeds and bugs, while retaining moisture and heat, including adding natural nutrition.
This layering (Sheet mulching) system mimics the leaf cover found on forest floors. By layering carbon and nitrogen material and other minerals, you are encouraging better nutrition as well as encouraging worms to thrive. Worms till and fertilize the soil for you.

Hugelkultur
During Fall and Winter, many plants are dying and Trees have overgrown which need to be pruned. Permaculurists call this process "Chop and Drop". If you watch the 'Val and Eli" video I provided in one of the links, you'll see the process of "Chop and Drop".
Any branches from a tree, or weeds, or dying plants can be chopped then used to mulch, giving back nutrition to a Tree or garden. Of course dead logs, sticks, and other plant cuttings can be used to make Hugelkultur beds. As the wood decomposes, the wood will feed and retain moisture for your plants in the dry season.
Also, these Hugelkultur mounds are making use of vertical space which saves garden area for more plants, trees, or bushes.
To see the Hugelkultur beds I started, watch the video here: Practicing Hugelkultur methods.


Another aspect of Permaculture design is diversity. A Forest maintains a wide diversity of plants in close proximity, like a polyculture system. For example, growing a Fruit tree, fruit bush, herb, flower, and Vining plant in a small area. Although in gardening, we tend to plant vegetables uniformly in single rows, like a monoculture of twenty rows of Corn or beans. 

Many Permaculturists avoid tilling and mowing their garden. Not only is the equipment expensive, but also the energy needed to run those machines. It's an expense on your wallet and the environment. It's so easy to be reliant on this society for goods and services, but there has come a time we must create our own energy and abundance.
This method of gardening tends to re-seed itself. Growing fruit trees, fruit bushes, nut trees, herbs, and flowers will come back every year. There is no need in purchasing seeds as long as save seeds from fruits and vegetables to grow the following year. You could also add your food scraps to a compost heap while adding leaves throughout the Fall and Winter, then the seeds will germinate in the Spring and grow throughout the Summer.
As stated earlier, to have a thriving Perennial garden and healthy fruits and vegetables, you must mimic the Layering system like a Forest.
First start by continually adding mulch, compost, carbon and nitrogen material, and rock dust on your garden. Around your Fruit trees and bushes, add mulch, compost, and rock dust to keep the plants thriving-- adding nutrition in your food thus providing you more nutrients. It is no wonder our closest ancestors eat a plant based diet--they are genetically and physiologically meant to eat fruit, but also because these foods re-seed themselves without our assistance. Fruit, nuts, and wild greens are the most natural and ethical diet on the planet. That should be lineage enough to eat raw vegan.

Other aspects of Permaculture include Rainwater Harvesting and Natural building. For rainwater harvesting, dig out a small dip for a pond. With this, you'll be able to water plants all year. Having a pond will also encourage frogs to create a habitat and birds will be encouraged to take baths. Both of which will help you control harmful bugs.
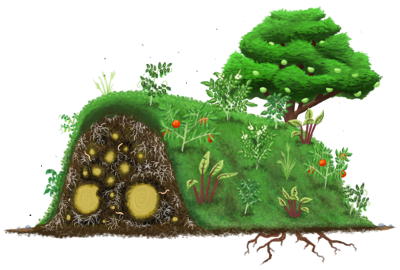
Next, Natural building, refers to Housing built with readily available or recycled materials, specifically natural ingredients such as Clay soil, straw, sand, sod, rocks. A natural housing structure represents the land from which the materials were provided. This type of housing allows you to design with the curvature of the land, or build your house around a tree. These houses are nearly Free.
Cob houses are simply the most beautiful and useful piece of artwork. The picture below is a good example of natural housing made inexpensive, quick, and less materials.


Of course I am not a great resource to explain the details of Permaculture. I am ready to learn and put these practices to the test. After several years of Conventional gardening (i.e. tilling, plowing, shoveling, etc), I am reinventing my garden to create a Food Forest. My vision for the growing spaces I work on, is to continually plant Fruit trees and other Perennial fruits and flowers. You can see my current collection of Fruit trees in the post here Fruit trees and Fruit bushes we are currently growing. My goal is to harvest seed from fruit trees and berries which I will spread all over the yard.
So far I have the typical Fruit trees which you can grow for my area. Considering I live in a cold climate, I intend to invest in other cold tolerant Fruit trees and Fruit bushes like, Mulberries, Gooseberry, Persimmons, Elderberry, Raspberries, Huckleberries, Jostaberry, Currants, Chokeberry, Paw Paw. And I would like to add rare types Tropical fruit that has been bred to be Cold Hardy. I have so far bought Cold Hardy Fig Trees (known as the Chicago Fig), and I am growing Cold Hardy Kiwi vines. Another I would like to invest in is The Russian Pomegranate.

For more information about Permaculture, visit the Permies.com website where you will find an array of information on gardening, homesteading, natural housing, natural heating, frugal living, and more.

If you would like to add anything to this post, please leave a comment below.


Friday, September 26, 2014

Gardening Mistakes I made in 2014

This post is a follow up from my post  Comprehensive list of my Top 20 Gardening Tips. Every year I am much more satisfied with my garden production, and the Fall season is a time to reflect on how I can improve the next Gardening year.
Although I make less mistakes in my gardens as the years go by, I usually have different issues every year. You can read my first and second year's gardening mistakes at Gardening Mistakes 2013 and 4 mistakes as a First year gardener. 'Mistakes' isn't the right word for it-- really, it's laziness. To be fair, I get a bit lazy as the Summer progresses into hot weather. Not only that, but because I have gardens off the property which I reside, I manage those gardens much less. On the property which I reside, the gardens are managed much better. Of course I slack on the gardening tasks necessary to have an impressive garden.
Often my issue comes from avoiding making plans. I don't always envision what needs to be done in the garden to make it better, so the tasks simply do not get accomplished.

cardboard around Cucumbers to suppress weeds
1. For example, when I made wide walking paths between my rows of potatoes, I expected many weeds to grow on the walking paths. I assumed I would be walking along the rows which would smother out any tall, invasive weeds. Actually I never walked through these paths so the weeds got too tall to manage. It wasn't until we were harvesting potatoes that we had to chop them down.
However, I did lay out cardboard for the long row of Cucumbers. The weeds weren't too terrible around the Cucumbers, but eventually the weeds were unmanageable because they sneaked through the cracks of the cardboard.
Although it's too late to worry, I collected cardboard from around the house days ago to lay them on walking paths between the rows of Tomatoes. This is task was preparation for transforming my Tomato and Pepper garden into Hugelkultur beds.
In the future, I am laying out layers of cardboard in between every row of vegetable as soon as I establish the rows. I am not waiting until we have weeds in the rows-- as soon as I hoe up mounds for the lettuce, potatoes, cucumbers, tomatoes, or anything-- I am going to lay down cardboard!
Cardboard is an unlimited resource if I can go into town. Behind every store, they keep cardboard stacked high in the garbage bin.

Tomato plants tied at the middle resulted in falling down
 2. Another task I slacked on was staking every Tomato plant. Of course I did stake every Tomato plant, but I improperly did so, which resulted in the Tomato plants falling over. Trying to save time and use less tobacco sticks, I posted one stick to every two Tomato plants. This was not a good idea considering I wrapped a string around both plants, instead of tying the plants individually.
Altogether, it was sloppy work, so next year, I am staking one post to one individual Tomato plant so that the Tomato plant can cling to the post. The real issue had been the two Tomato plants on either side of the stick was too far away to remain up against the stick, so the base fell onto the ground because I could not tie the base of the plant to the post. I could only tie off the middle of the plant to the stick.
As for Tomato plants, I don't think it will be necessary to start any Tomato plants indoors or purchase any Starters because my Compost beds always produce Tomato sprouts (even all over the yard and in my windowsill Tomatoes sprout).
Squash Garden
3. I still struggle with the best way to grow Yellow Squash and Zucchini. No matter how I grow them, because they become large and fragile, they fall over exposing their root systems.  I have directly sown them in large mounds, started them indoors, and even grown them so that I could continue to add soil around them (as you can see in the photo to the right).
I haven't seen "better" ways to grow Squash besides Permaculture methods, meaning to grow Squash in compost on top (or within) straw bales. Growing Squash plants in straw bales will be an option for next year considering we are taking a whole new approach to gardening with less tilling and utilizing hugelkultur methods.

4. My only quarrel with my Melons was that I started them as early as I could, and still they grew slow and small. My Cantaloupe fruits grew to perfect size, but my Watermelons were small. Almost all of my Watermelon developed a rotten spot on their bottoms. I wondered if this had to do with too much rain, as some have told me they do not like to be over-watered. I was proud that I maintained persistence in watering my Melon gardens through the dry weeks. Then again, the rotten spot could have been due to laying on the ground. Next year my plans with the Melon garden include laying out cardboard in the walking paths; composting all Watermelon plants; and mulching so that they retain moisture. I may also create a Trellis specifically for growing Melons so they can vine up instead of crawling all over the walking paths. 
The only Cantaloupe plant that produced the most (and biggest) melons was the Volunteer Cantaloupe plant growing amongst my strawberries. Of course this bed is full of compost and by continually watering this bed, the Cantaloupes flourished. My other gardens of Watermelons and Cantaloupe were either too small to eat (non-mature so unripe to eat) and many of them became rotten. Some Watermelon fruits became ripe enough to eat, though.
Altogether, Melons require much more maintenance, nutrition, different soil ratios than other plants. For this reason, I will also add creek sand for better aeration. By implementing compost, mulch, and trellises into the Melon gardens, I will have a much better Melon harvest next year.

deformed Cucumbers
5. I am surprised that I harvested less Cucumbers this year than the last. I directly sowed over 400 Cucumber seeds into a long row. Half of the row gets partial sun while the other half gets less sun than that. Obviously I was not surprised that the other half would not produce, but Cucumbers do well in partial sun (as noticed in the last three years of growing them).
Of course almost all of my Cucumbers plants sprouted but the other half which received no sun never made it to flowering.
I may have Cucumbers growing as we speak, but as far as I know, I harvested only two bags of Cucumbers. They were smaller than last years too, and somewhat deformed (see in photo above.) These Cucumber seeds came from last years harvest, so I am incredibly confused by the turn out.
Not only that, but I smothered most of the weeds around the Cucumber plants with cardboard, which still did not help their production. They also retained plenty of moisture and nutrition because the soil was in excellent condition.
Because Cucumbers are vining plants, my goal for them as well as the Melons are to create a Trellis so that they can crawl up and away from the ground/weeds. 

Corn growing close together
6.  The Corn rows were spaced too close together. The only reason I grew Corn was because it was on my Grandparents' property, and they wanted some from our Garden. Of course when we directly sowed the Corn, we did not imagine walking through narrow rows of prickly, fuzzy plants to harvest the Fruits. You can hardly walk through the path between rows to harvest. Considering the Corn was small anyway, we harvested some on the outside rows but we are leaving the rest to animals. Once the stalks die, we will use them as mulch or in our hugelkultur beds. Next year, I am not growing Corn unless if it is in small quantity, perhaps a couple of plants, rather than the 9 rows of Corn we planted this year. Corn is indigestible and a waste of my time. 

rows of small & large Pepper plants
I'm not being totally hard on myself, I made great alterations and improvements within the garden. For example, when my Strawberries were being eaten by birds, I placed figurines beside the fruiting plants which immediately kept the birds away. Also, my Lettuce garden this year flourished, along with the Kale. My Pepper plants did a great job because I was diligent in watering them and putting compost around the biggest plants (I even diluted my urine as a fertilizer for the Melons and Pepper plants). Because I predicted the Pepper plants I grew from seed were not growing as they should, I purchased several Pepper starters from Lowes --just to be safe. It turned out, all of the Pepper plants I had started--even the smallest Pepper plant--produced Peppers.

As mentioned, I'm taking a different route to gardening. Instead of exclusively Tilling the garden and having structured rows of Vegetables-- I am focusing on Permaculture methods, utilizing Hugelkultur beds, Straw bales, and Companion planting. I will also be growing Flowers within the garden. I will discuss all of this in more detail in a later post. 

I am already writing up information about Vegan Permaculture methods, and future gardening plans, so be on the look out for that post in the next couple of days. Also look through my most previous posts how other gardeners are recreating their own backyard into a Food Forest, Permaculture Trio and Val and Eli's Permaculture Paradise.
 

Thursday, September 25, 2014

"Permaculture Trio" -- Forest Gardening, Edible Landscapes & Urban Permaculture

"This video consists of three mini-documentaries:

1. (0:12) FOREST GARDENING with Robert Hart
Find out loads about what forest gardening is, and how to make your own!

2. (15:55) PLANTS FOR A FUTURE with Ken Fern
Second is an amazing case study about Rural Permaculture in Britain, showcasing loads of amazing edible plants, aquaculture and flowers, as well as fantastic medicinal plants. Look out for a cure for female infertility that's dropped in here!

3. (32:08) URBAN PERMACULTURE with Mike & Julia Guerra
This is a brilliant and inspiring documentary of permaculture techniques used effectively in an urban back garden. WIth little more than 2 hours of work a week, this couple produce about a fifth of their food intake!"

Val and Eli's Permaculture Paradise (video)


Thursday, September 11, 2014

How to Garden for free & Comprehensive list of my top 20 gardening tips

1. Hoe soil into short, wide rows for root vegetables and greens. The wide rows appeals to crowding greens and root veggies and allow for wide walking paths (like I have done in the picture below). The "crowding" method seems to prohibit weeds from growing. Also Short rows have also been effective for preventing pests because too much of the same kind of plant in a grouping attracts bugs.


2.  Create trenches in between sets of plants. When planting Peppers or tomato plants, or any plant-- hoe wide rows so that two plants grow side by side. The trench in between the plants will collect water like a chamber. This will allow the tips of roots to stay moist even if the sun has dried out the top of the dirt mound. For example, in the picture above, I have grown my lettuce in large wide mounds with wide walking paths (where water collects after heavy rainfall). 

3. Root vegetables, peas, and greens can be crowded. Despite what the instructions say on the back of seed packets, many plants do not need much spacing. Greens benefit from crowding because it  prevents weeds from sprouting in between. If I had a small amount of radish, turnip, peas, etc, I will squeeze all of these into one row rather than spreading the seeds for apart into different rows. The idea is that, you want to allow space for growing more variety of vegetables. See tip #4.
Side note: Root vegetables, peas, and greens (even cucumbers) can be grown in shadier locations of your garden during the Summer. Tomatoes, corn, peppers, and melons must get direct sunlight.

Crowding method with lettuce

4. Vegetables do not need much spacing. Aside from tomatoes and corn, most vegetables and fruits can be crowded. Here is a good rule: when sewing with seed directly in the garden, do not try spacing any more than 2-3 inches apart; however for Fruits and vegetables you are Transplanting, space these plants no more than 10 inches apart. Considering beans, cucumbers, melons and vining plants can be grown on a trellis, there is hardly any need to space these plants far apart.

Remember to continue to hoe (or add) extra soil/mulch around plants to allow roots to spread.

5. Root vegetables, beans, peas, greens, zucchini, squash, and cucumbers should not be started indoors. These fast growing vegetables can be directly sewn into the ground. Peas, root vegetables and greens can be planted in March through April, depending on your zone. Zucchini, squash, cucumbers, and beans can be directly sewn after the last threat of frost, usually first week of May. 

6. Tomatoes, peppers, and melons should be started indoors because of their long growing season. Allow tomato plants to grow 1 to 2 feet tall before transplanting to garden, then bury nearly the whole stalk (leaving top branches above ground). Use method #7 for proper tomato, pepper and melon growing.

7. Plant tomatoes 12 inches apart from each plant, be sure to tie your plants to post once they reach 2 feet in height. Continue to tie the main stem as the plant increases in height. In the following pictures I have demonstrated a technique that grows large tomatoes: first, plant two rows of plants close together for support, while leaving 2 foot wide walking paths in between. This technique prohibits weeds and bugs, allows drainage when dealing with floods, and creates an overall professional appearance. The wide paths in between the sets of rows allows for easier picking, hoeing, and tilling. By continuing to hoe dirt up around the tomato plants will promote larger and healthier stalks.

Paths for walking

8. Make your own soil (compost) with food scraps. Compost is the most nutrient rich soil, and will boost your plants like fertilize. For more compost ideas and information go to two of my posts here, "Compost your food scraps..and get food back for free" and "What you need to know about compost". Compost is a versatile and can be used for starter plants, growing in buckets or pots; and use compost to fill a raised bed (go here for raised bed and container garden construction).

Particularly compost that is not completely decomposed, Tomato plants, peppers, and squash will always sprout and flourish in my raised beds I have full of compost. Actually, I wish I had about twenty raised beds full of food scraps because I would not need to sew seeds, I could just hope for the volunteer Tomatoes, peppers, and squash to sprout. Last year in one of my Strawberry beds, I had one volunteer Butternut Squash plant that exploded with 20 Butternut Squash fruits! I truly believe the location and compost within the strawberry bed made the Butternut Squash flourish. This year in a different Strawberry bed full of compost, one volunteer Cantaloupe plant produced 10 Cantaloupe fruits! I never have that much yield in a typical garden. From now on, I want to experiment by making additional raised beds, filling them with food scraps, and enjoying the ease and simplicity without tilling and hoeing, while enjoying the high yields of the food that Compost produces.

Along with creating your own soil, dry out grass to make your own Straw/mulch. Simply Mow your lawn, let the chopped grass dry out for a couple of days in the Sun, and collect the grass once it turns into straw. Collect leaves as well to use for mulching.

Picture of my compost two years ago. I finally used it for my
strawberry bed.
9. Transplant your fruits, vegetables, or bushes/trees in the evening. Sowing seeds during the Sunniest/hottest part of the day isn't harmful to the seeds, but transplanting your starters in the middle of the day in the Summer will scorch your plants and possibly kill them.

10. Watering plants during the evening. Following up on Tip #7, the most optimal time to water plants is during the evening, after 5pm because the water will not evaporate and instead the moisture will be retained during the Night. And considering plants do most of their growing during the night, it is optimal to water right before dark. Remember to water plants every other day until hot Summer temperatures--then I would suggest watering everyday, maybe even twice a day depending on your climate. Go to tip #18.

Bean crawling up posts
11. Trellis Vining plants, such as Melons, cucumber and Beans. Allowing the Melons, cucumbers, Peas and Beans to crawl up tall Poles or trellises. Trellises will enable you to see & pick the Vegetables much faster, and you don't hurt your back bending over.

12. To Prevent pests, avoid growing Plants that attract the most bugs. Every time I plant cabbage, broccoli, collards, and kale, the bugs eat the entire plant. I had success with Kale this year, no bugs have demolished them, however I grew up to 200+ Broccoli plants in the garden, and something (bug or animal) ate the tops off every single one. Altogether, I avoid growing these vegetables, but my collard greens have been doing fine thus far.
Another method to avoid pests, by planting onions, basil, other herbs, and hot peppers around most vulnerable plants. As mentioned in Tip #1, too much of the same kind of plant in a grouping attracts bugs unlike a variety of plants in one grouping.
I had a small problem with Squash bugs eating my Zucchini plants, so every day I sprayed Vegan dish soap diluted with water, onto each plant for a week. This kept the bugs from eating the plants, and once the plants grew large enough, the bugs subsided.
This Summer I needed to prevent birds from eating my Strawberries, so I placed a Turtle and Snail figurine beside the Strawberries. This method absolutely has kept away the birds for weeks, and I have finally been able to harvest many more.

13. Tomato, Corn, and Beans do not require Fertile, rich soil. These three foods are the garden's staple-- at least in my home state of Kentucky. Tomato, corn, and beans will perform much better with nutrient rich soil, however they produce well growing in clay soil with no compost, mulch or or any nutrient supplement. Fortunately, these three foods are also the easiest to grow because they require little maintenance.

14. Tomato, Corn and Beans are the easiest to grow. Tomatoes will grow out of anything, anywhere, and at any time; and almost always produces higher yields than any other plant. I have had Tomatoes sprouting out of my windows!! If you are a first year gardener, tomatoes are the number one vegetable for a beginner...Tomatoes do not require much maintenance, as well as Corn and beans. No need to compost, mulch, or add any nutrients, as mentioned above. Some hoeing around Tomatoes will be beneficial but hardly necessary for corn and beans.

15. Peppers and Melons require Nitrogen rich soil. Not only do these plants and many others need nutrient rich soil, they require much more watering than tomatoes, corn and beans. Plants that need particularly more fertilizer are peppers, cantaloupe, watermelon, eggplant,and fruit trees. Fertilize once every two weeks until plant begins to harvest. Refer to Tip # 19 on making your own fertilize.

16. The best conditions for your starter plants. Begin by filling compost into starter trays, such as the 100ct or individual containers, or Styrofoam cups. Compost usually contains more nutrients than commercial soils, so this will give your seeds a much needed jump start. Making your own compost with food scraps will become your own free resource. 
While germinating the seeds, keep the soil moist by watering every other day (or more). Before the plants sprout, keep a lid on top of the plants to retain heat and moisture. Seeds/plants respond well to warm damp environments. My grandmother also tells me to keep the containers of seeds in a dark location or keep a dark lid over top of them during germination. Germination will last until the seedlings pop up, usually with 1-2 weeks.
After seedlings have popped up, take the lid off and keep in a sunny location. Seedlings will require at least 6 hours of indirect sun. When starting seeds indoors during Winter and Spring, use lamp lights or other artificial lighting if necessary, that may aid in the plant growth.
After several weeks to a month, transplant seedlings into the garden or a wider container. I ended up transplanting my Melons into three different containers until I finally transplanted them in the garden, but that is unnecessary if you start off by sewing seeds in a large container.
Unlike greens, squash, peas, beans, and corn that can be directly sown-- the plants that prefer to be started in a container to be transplanted are Tomatoes, peppers, and melons, eggplant.


raised bed made of logs and bricks
17. You do not need to till, hoe, or shovel to have a garden. In fact, I would suggest gardening in contained areas with plenty of rich compost and mulching will be easier on your budget, physical strength, and potentially will grow better quality of food. Also tilling breaks up the intricate microbes of the soil. It's easy to destroy homes of frogs, spiders and other things when you're disturbing the soil. There are plenty of techniques to avoiding tilling, shoveling and hoeing. 
Using straw bale with compost, or containing compost within a rectangular raised bed will allow you to grow food without tilling. You can also use buckets and pots to contain soil. Almost all vegetables and some fruit plants will produce/grow in pots/buckets. For more information about no-till methods, go to my post here: How to build a raised bed for gardening (No-Till methods)

18. Water garden everyday. When planting greens, root vegetables and herbs during the Spring, generally you're not going to need to water your plants because there is usually heavy rainfall during this time. However during the hottest part of Summer, you will want to water the plants every day. I would resort to watering two times a day (during the early morning and late evening). I will do this for plants that I recently Transplanted because they are more susceptible to Sun damage. Of course, it's not necessary to water Tomatoes, corn, potatoes, and beans with much frequency. However melons, greens, and peppers benefit from heavy rain. Cucumbers and squash also prefer constant watering.

rain barrels
The frequency with which you water plants will depend on your climate, the time of year, etc. The main point I wanted to make was, most people in the world are not allotted with enough water for growing plants. By implementing rain barrels against your house, you will be able to collect enough water to cover large gardens. Water can go along way, so even sitting out bowls, jars, cups, and any plastic container, buckets etc, you will be able to collect water for all your gardening needs. For more info on saving water, go to my posts:  How to save water 1 and How to save water 2. Tap water simply keeps the plants alive, but rain water makes plants thrive.

19. Make your own fertilizer with your body. Human urine is rich in nitrogen, potassium, and phosphate, which are all essential for healthy plants. Compost soil acts as a fertilizer because of the nutrient density and it's always best to use compost for starting plants indoors and also spreading compost around plants in the garden. Although I used compost on many of the plants in my garden, I wasn't able to spread all the compost onto every plant. In this case, I began urinating on plants that needed fertilized, like weak Pepper plants or weak Tomato plants. Remember to dilute your urine because it may be too high in nitrogen and salts. Even my watermelon mounds received some urine fertilize throughout the growing period. I haven't experimented with my own feces, but I will bring this up in a future post about composting toilets.

20. Cover plants with cloches in threat of overnight Frosts. Cloches are row covers or something that protects plants from cold temperatures. It's not unusual to start vegetables outdoors early in the season if you want to give your plants a head start. I usually grow greens, peas, and potatoes at the end of March and beginning of April, but these vegetables do not require covering unless if you're starting them at the end of February and beginning of March.
It may be perfectly warm and sunny during February's days, but most likely freezing at night. You can use recycled plastic containers of all kinds to cover individual plants overnight. You can also use plastic sheeting to create long row covers. In the morning, uncover the plastic container or sheeting to allow plants to breath (do this until no threats of Frost).
Many plants benefit from growing during the cool Spring weather, like Spinach, cabbage, Brussels, Swiss Chard, Kale, Collards. 
The earlier you plant seeds indoors or transplant outdoors, the earlier you will harvest food.


I skimmed other gardening websites for their Top Tips, and I found that they were the least helpful. Most of the tips I found were vague suggestions, and spoke too much about gardening tools. I wanted to provide specific suggestions that will answer all of the questions of a beginner. Also my intention was to provide options for people that have little to no money, for example: collect rain water, make soil with food scraps, and implement no-till methods. One last tip I suggest trying (another free way to grow food), is to sew seeds from fruits you bought from the grocery store or farmer's market.
For instance, if you purchased cucumbers, squash, melons and tomatoes to eat, eat the food and save the seeds from these fruits. Dry out the seeds, store in paper envelope in a cool and dry location of your home, then use them when you're ready to plant.

This extensive list of my Top 20 Gardening tips will continue to grow throughout the years. Maybe if I took another couple of days to write, I could have come up with 50 Gardening tips. My main message is to think of plants like ourselves, Focus on the basic needs of plants: food, water, sun (heat & light), oxygen, and sleep.

Practicing Permaculture methods will allow you utilize your creativity in growing food with little effort and no money.
For the last three years of growing food, I have made lists of my mistakes, which you can find here Gardening Mistakes 2013 and Gardening Mistakes 2012.

If you're an experienced gardener that would like to make corrections to this list or add suggestions, please leave a comment below.